

Chapters · Chapter 6 of 8
Switch configurations with Profiles
Check Profile status, preview changes, and apply complete configurations across multiple applications.
Joining here?
Stop Pinman, run this command, then start Pinman again. It rebuilds the sample project up to this point, discarding any work you have already done in it.
pinman tutorial goto profilesWhat to expect#
So far you've used Pinman to watch what happened as you worked on the workstation. You now have two good configurations—the Video Editing settings and the Final Recording settings. You can collect those settings into separate Profiles that make it easy to switch between them.
Rather than walk through Profile creation here, they've already been prepared and included in this tutorial, so you can go straight to using them.
Steps#
Profile status#
- From the main navigation, select Profiles to open the Profiles page.
The Profiles page contains the saved Profiles for this project. Some report In sync and others report Drift, as shown below.
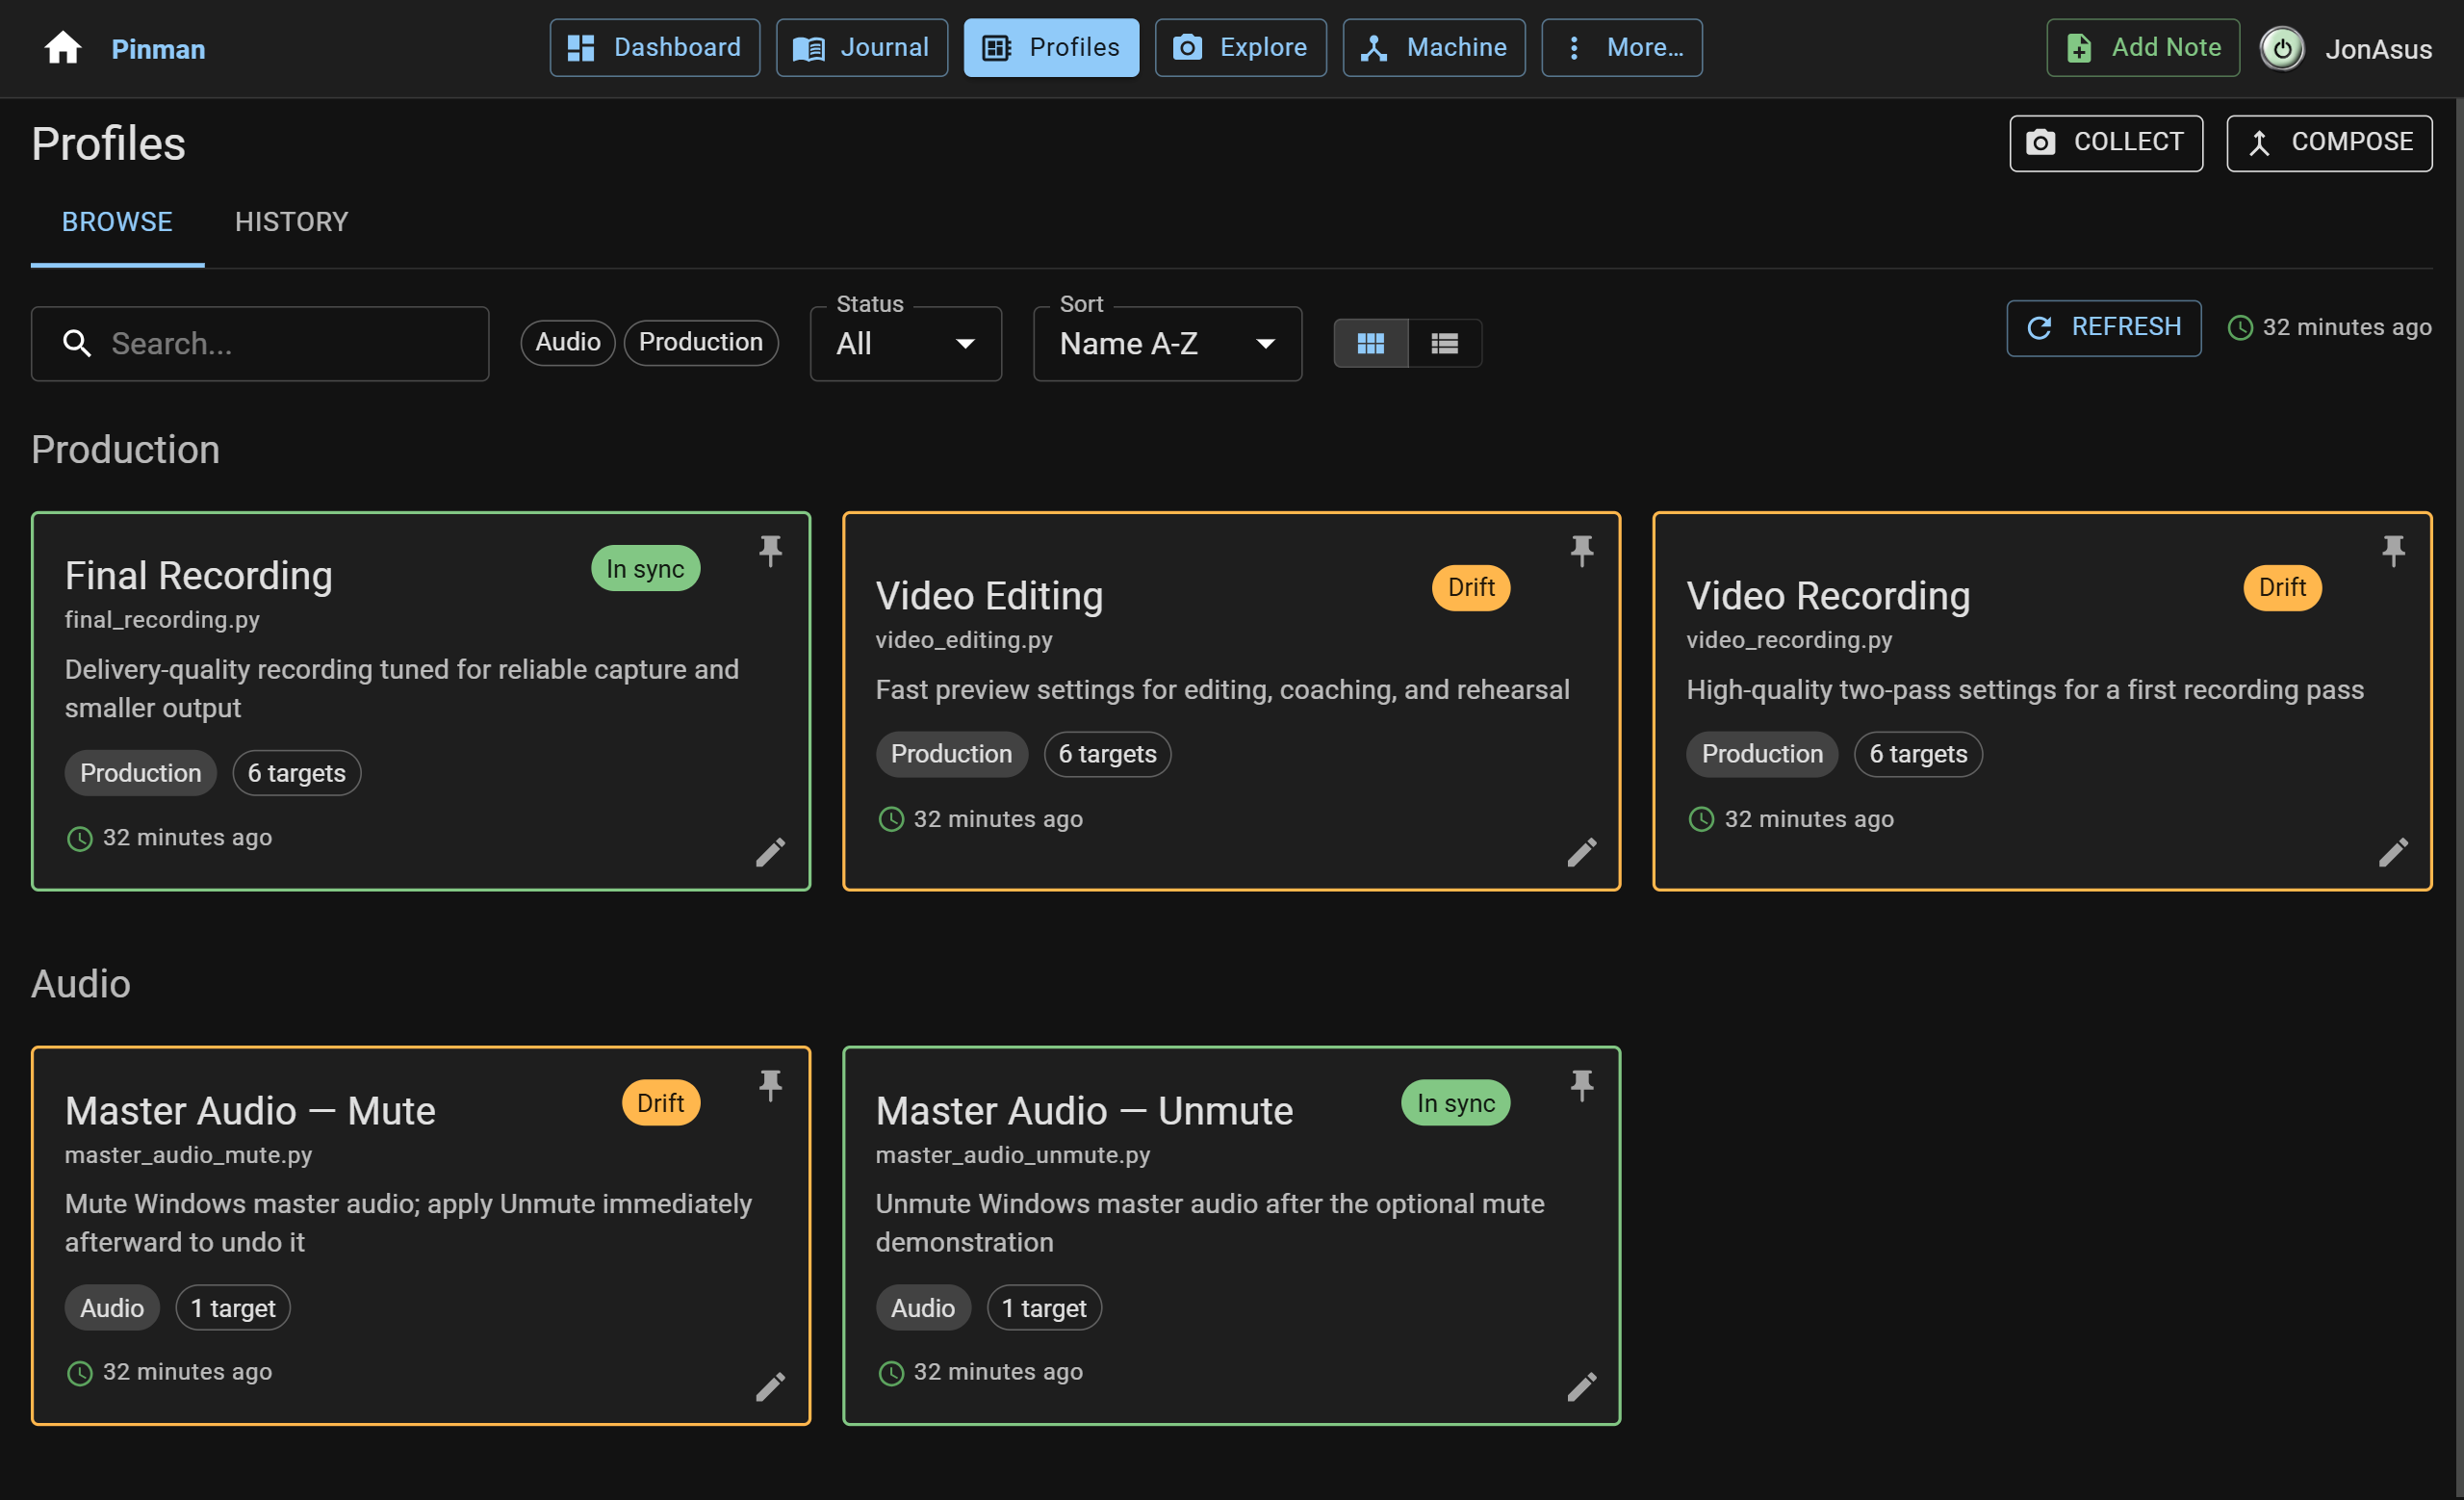
A Profile is a fixed set of target values; it does not change on its own. In sync means every target matches the live settings, while Drift means at least one differs. For example, Final Recording reports In sync because the live settings match the Profile's target values.
These Profiles correspond to states from the tutorial:
- Video Editing: starting settings
- Video Recording: prepare drift settings
- Final Recording: optimize drift settings
You can open a Profile to see for yourself.
- Select the Final Recording Profile to open its Preview.
- The Preview shows the target properties and values in that Profile. It reports In sync, so there's nothing to change. Select Cancel to close it.
Now take a look at the Video Editing Profile.
- Select the Video Editing Profile to open its Preview.
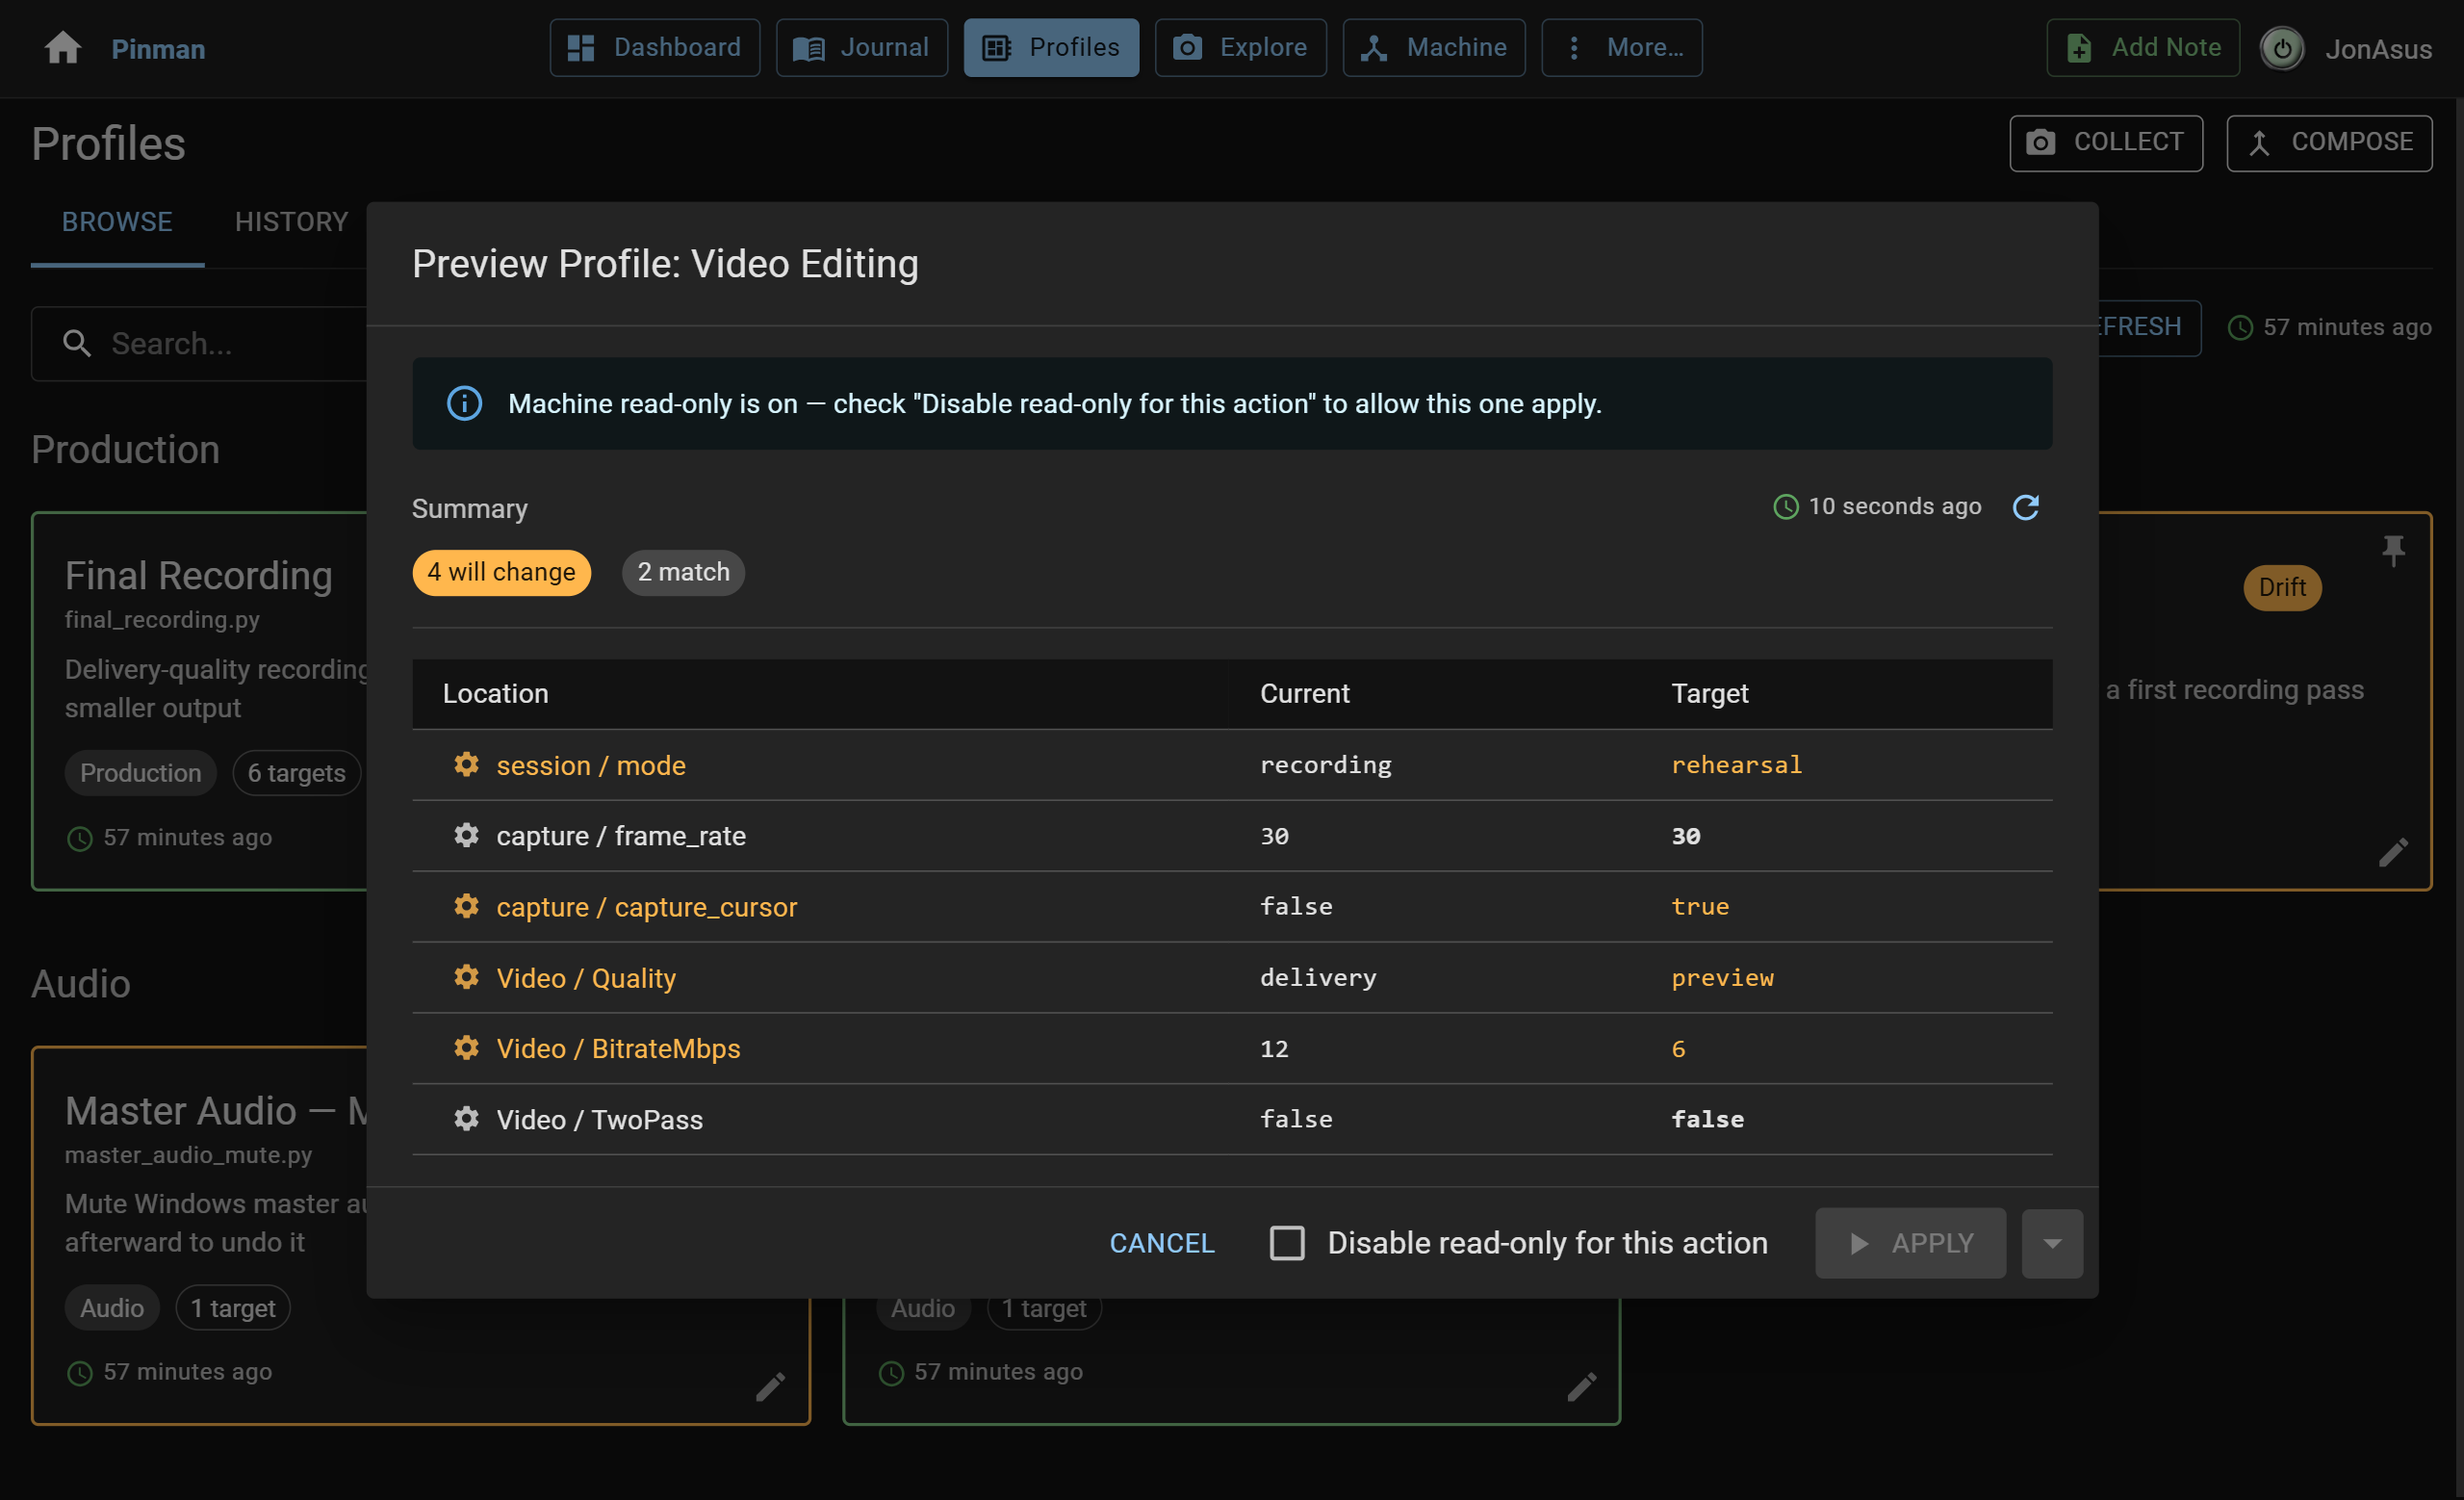
- The Preview shows that some target settings differ from the Head, and would be changed if you applied the Profile. Leave the Preview open for the next step.
The following screenshot shows the Video Editing Preview with its current and target values:
Applying a Profile#
Let's apply the Video Editing Profile to switch back to that configuration.
- With the Video Editing Preview still open, check Disable read-only for this action.
- Select Apply, then close the Preview.
Video Editing now reports In sync, while Final Recording reports Drift.
- Open Explore
- Select Refresh to bring the Head up to date.
The properties we've been tracking now match their earlier values.
Comparing with an old Capture#
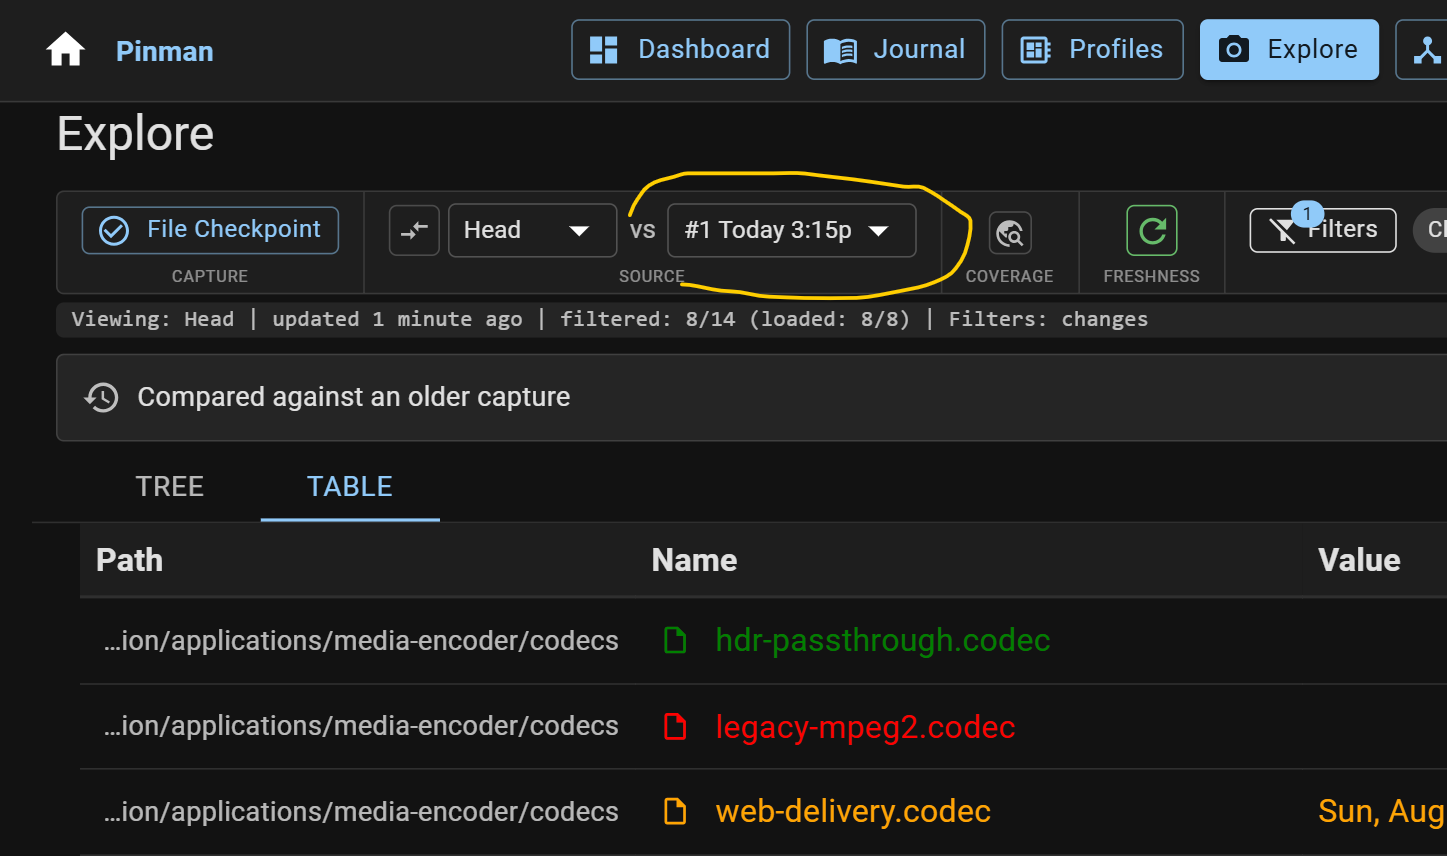
Compare the Head against your first Capture (#1), the Video Editing baseline. The tracked settings agree.
- Go to the Explore page. In the Explore toolbar, find the Source controls. Leave the Source as Head but change the
Reference Capture to the first one (labeled something like
#1 Today - Video Editing Baseline).
The Explore table contents are updated to show the current system Head against the baseline from earlier (capture #1). As you might expect, the only differences are the codec changes, which the Profile doesn't manage. The other application properties now match the baseline.
The following screenshot shows the Head compared with the first Capture:
-
Before leaving Explore, select RETURN TO HEAD in the alert above the tree. This restores the default comparison of Head against the latest Capture.
If any filters are active, such as Changes only, open Filters in the toolbar and select CLEAR ALL FILTERS.
Now switch the configuration back to Final Recording.
- Go back to the Profiles page and select the Final Recording Profile.
- Check Disable read-only for this action, select Apply. When it completes, close the dialog box.
- Go to the Explore page and select Refresh. Applying a Profile writes the new values into the Head, but only a Refresh re-compares the files and folders around them — so this is the step that settles the tree.
Editing Profiles—advanced#
On the Profiles page, the Edit icon on each Profile lets you see and edit its target property paths and values in a grid view, or view and edit the Python script directly.
- Go to the Profiles page and select the Edit pencil-icon on the Video Editing Profile. This opens the grid view of target paths and values.
The following screenshot shows the Profile's target values in grid view:
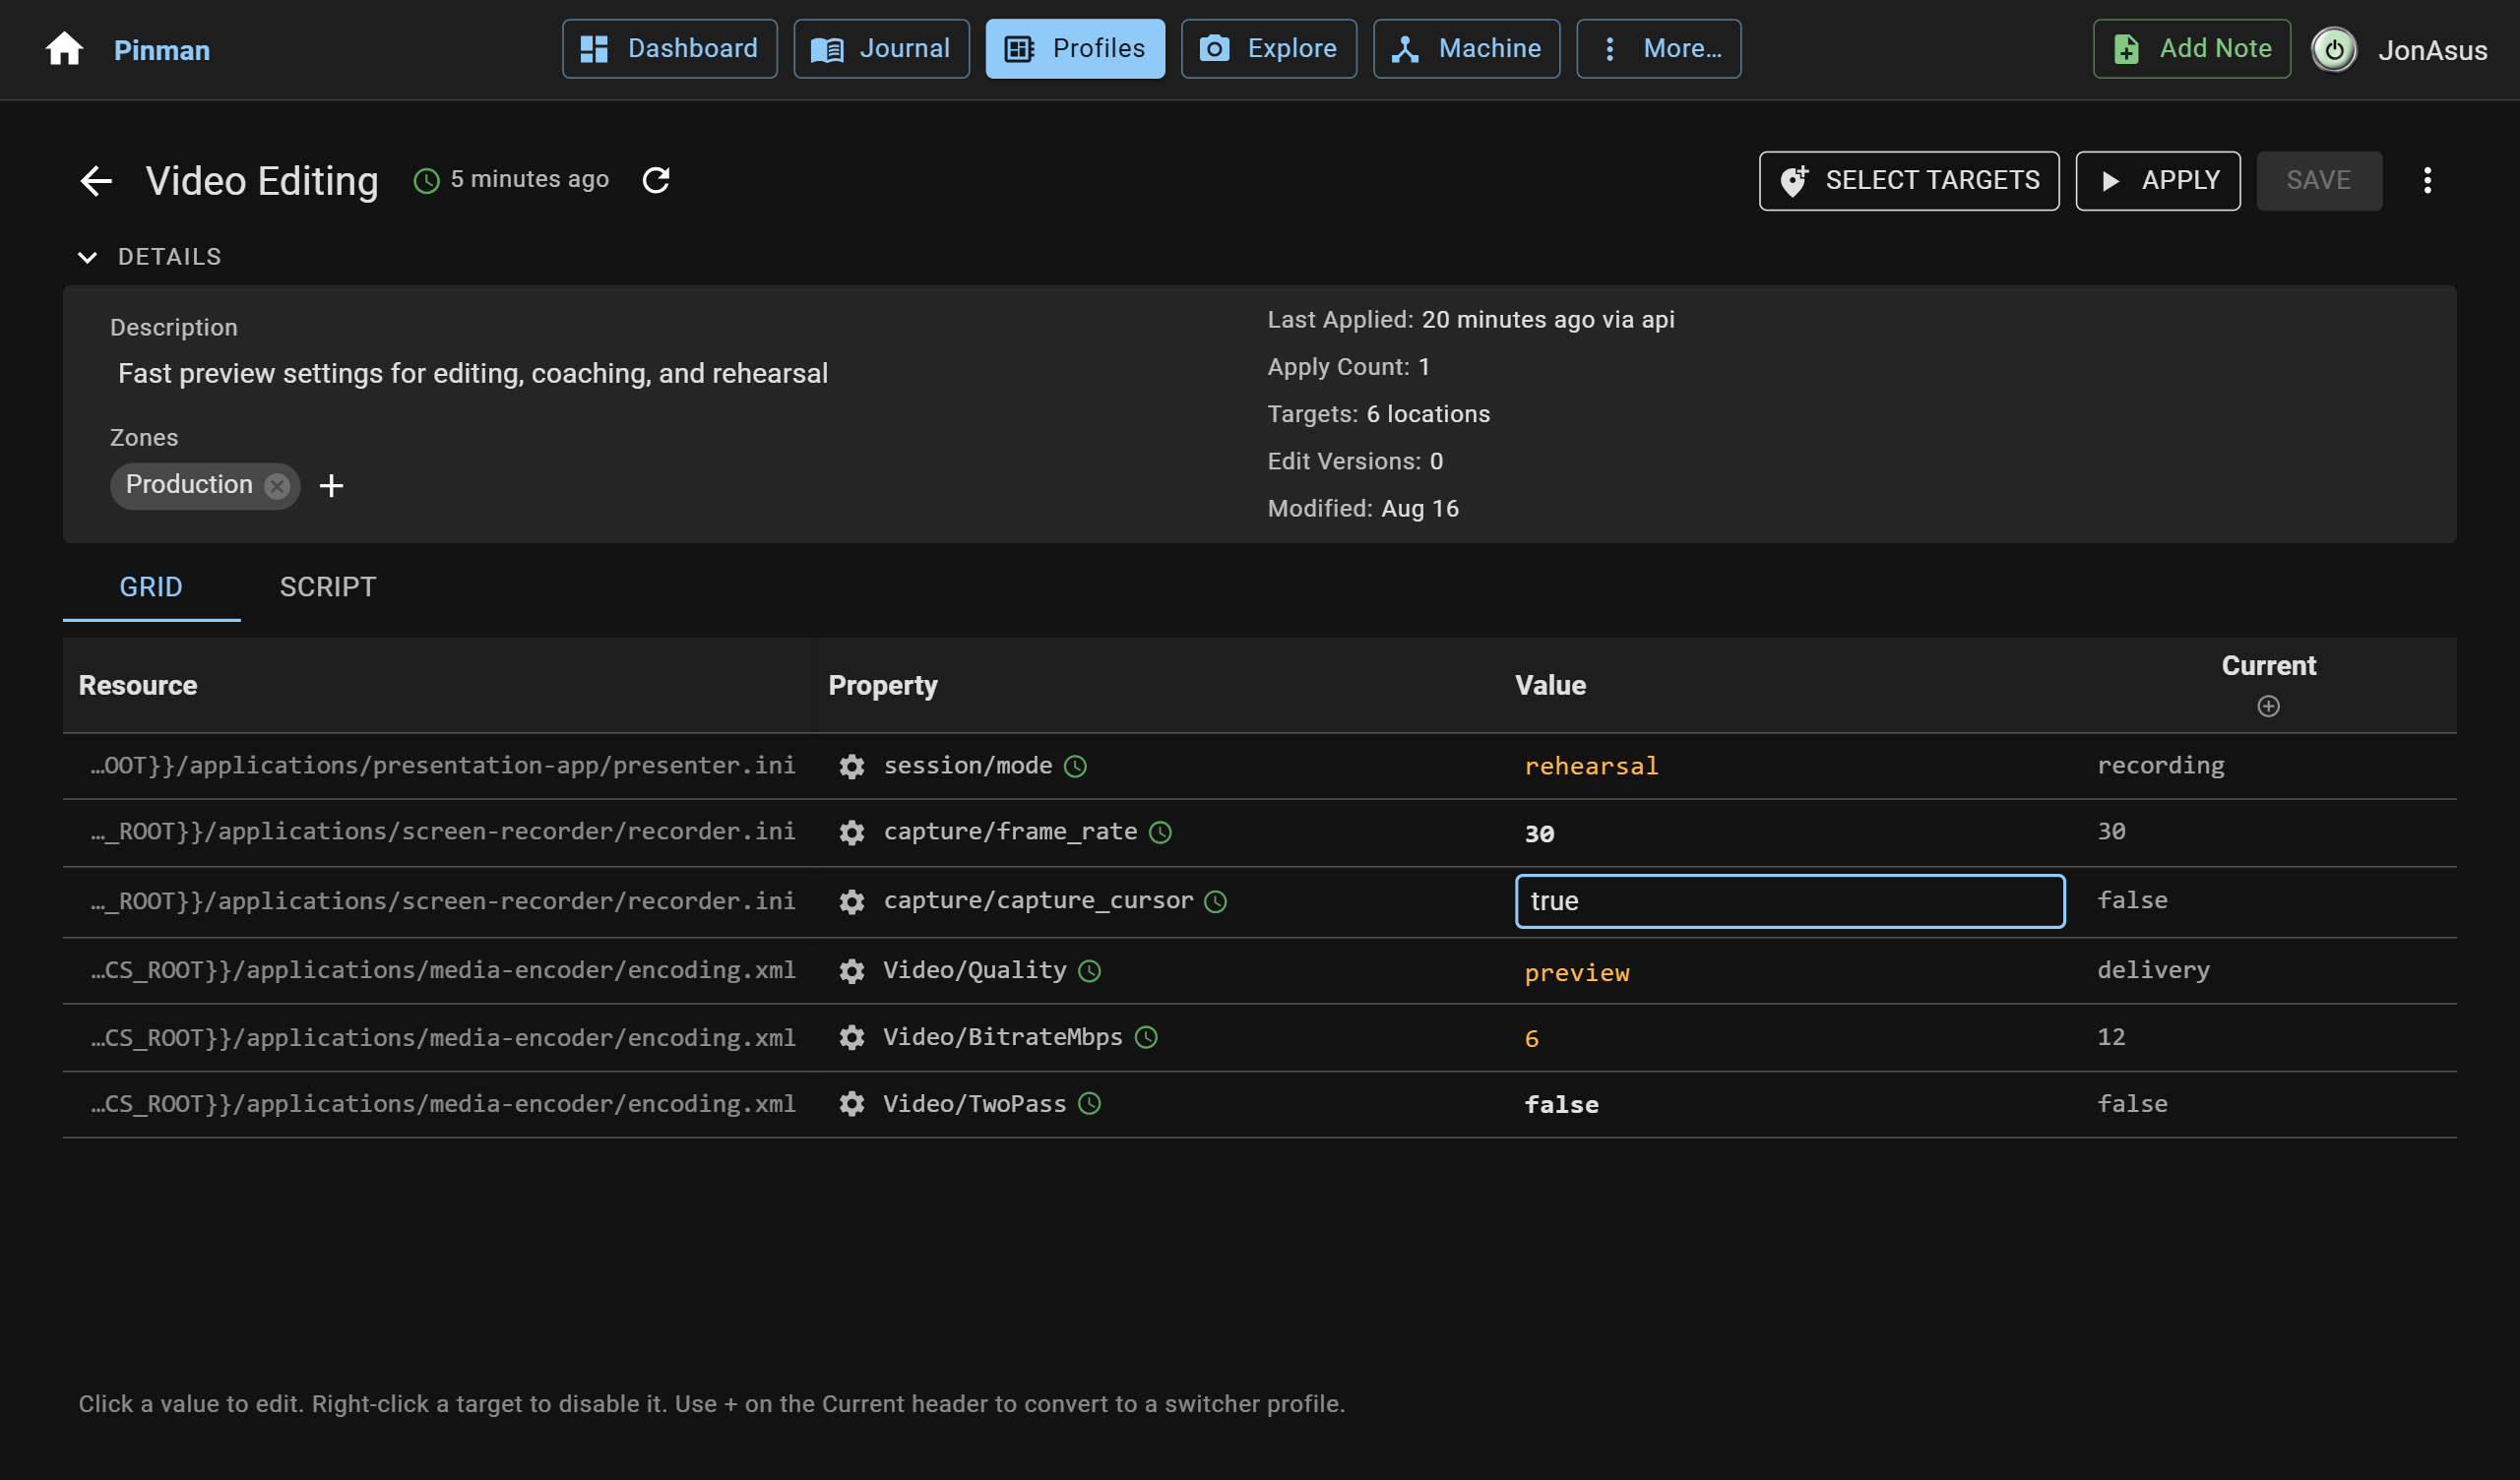
You can actually modify any of the target values here, but let's not do that now. The Script tab opens the underlying Python script for the profile, which can also be edited directly (but let's not do that now either).
- Select the Script tab to see the Profile's source code.
- When you're ready, click the back-arrow in the upper-left to exit the Profile edit mode.
Note, as a programmer, you could also edit the Profile's Python script in your favorite code editor, with syntax highlighting and other IDE goodies.
What we did#
Profiles collect related target values across applications into reusable configurations.
You checked the saved Profiles for drift, applied one to switch the machine's configuration, confirmed the switch in Explore, and switched back. With a couple of clicks you moved multiple related settings across several applications. A Pinman Profile coordinates a complete working configuration, not one application's preset.
Pinman tracks more than files and the data inside them. Next, let's look at the Windows Registry and Windows runtime settings.
Instructions#
-
From the main navigation, select Profiles to open the Profiles page.
-
Select the Final Recording Profile to open its Preview.
-
The Preview shows the target properties and values in that Profile. It reports In sync, so there's nothing to change. Select Cancel to close it.
-
Select the Video Editing Profile to open its Preview.
-
The Preview shows that some target settings differ from the Head, and would be changed if you applied the Profile. Leave the Preview open for the next step.
-
With the Video Editing Preview still open, check Disable read-only for this action.
-
Select Apply, then close the Preview.
-
Open Explore
-
Select Refresh to bring the Head up to date.
-
Go to the Explore page. In the Explore toolbar, find the Source controls. Leave the Source as Head but change the Reference Capture to the first one (labeled something like
#1 Today - Video Editing Baseline). -
Before leaving Explore, select RETURN TO HEAD in the alert above the tree. This restores the default comparison of Head against the latest Capture.
If any filters are active, such as Changes only, open Filters in the toolbar and select CLEAR ALL FILTERS.
-
Go back to the Profiles page and select the Final Recording Profile.
-
Check Disable read-only for this action, select Apply. When it completes, close the dialog box.
-
Go to the Explore page and select Refresh. Applying a Profile writes the new values into the Head, but only a Refresh re-compares the files and folders around them — so this is the step that settles the tree.
-
Go to the Profiles page and select the Edit pencil-icon on the Video Editing Profile. This opens the grid view of target paths and values.
-
Select the Script tab to see the Profile's source code.
-
When you're ready, click the back-arrow in the upper-left to exit the Profile edit mode.